


Share this
by Dan Keslin on September 29, 2020
%20in%20QuickBooks%20Online.png?width=677&name=How%20to%20Create%20Bank%20Rules%20(to%20Save%20Time!)%20in%20QuickBooks%20Online.png)
7 MIN READ
Ask any advisor what they need more of and chances are they won’t say clients first—they’ll say time. While we’re incapable of offering you more than 24 hours in a day (if any outsourced solution claims otherwise, run in the opposite direction), we can offer you some of your time back. Whether or not you currently use FA Bean Counters for your bookkeeping needs, this blog is bound to save you some time on your books. The only catch is that you use QuickBooks Online (or QBO as those in the bookkeeping biz call it).
In our last blog, we covered how to tackle shared transactions in QBO; this month, we’re covering banking rules. Sound boring? It kind of is. But it’s also pretty darn useful. When used properly, rules can automate the categorization of the majority of your recurring expense transactions, transfers, and deposits, saving you what could be a few hours, or even months. The downside? If done incorrectly, rules can wreak havoc on your books and most certainly cause your hair to prematurely gray.
We recommend you start by creating easy rules for recurring transactions (think XYPN monthly dues), then increase the difficulty as you become more comfortable understanding the criteria to make a good rule. Let’s get started.
There are a few ways to access the rule creation tool in QBO. Let’s start with the easiest.
- Create a rule from within the transaction. To accomplish this, navigate to your banking feed (if this sounds like gibberish to you, run, don’t walk to schedule your setup and training service). From there, click on a transaction you want to work on. Toward the bottom of that transaction line, click the “create a rule” link (pictured below). This will allow you to set the rule and its criteria. QBO will pull data from within the transaction you select. This is hands-down the best and easiest way to create a rule—try and change my mind.

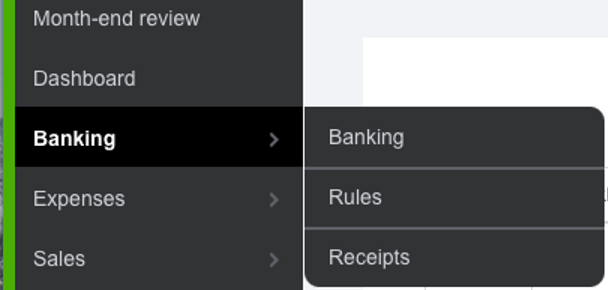
- The next method is accessed from directly within the banking page via the three tabs: Banking, Rules, and Receipts. Toggle from banking to rules and you will be able to see all of your rules and create new ones. This is in my opinion without a doubt the best way to access and review all of the rules you have created.

- Hover over the banking tab and click the second item, “Rules.”
- The fourth and final way is less common to see or use. If you add the same transaction (the same vendor, amount, category, etc.) two times, QBO will ask you if you want to create a rule.
Up next, how do you create a rule? Follow the ABC process (fair warning: the process has steps all the way through letter "I") below to get your rule-adding game on track.
A. Using method #1 from above, click the “create a rule” button. The “create rule” tool will pop out on the right side of the screen.
B. Name the rule. Be sure to rename it versus using the auto-generated (“suggested”) name to avoid cluttering up your rule list when searching later. Be clear and concise when naming the rule and you’ll save yourself a headache down the road.
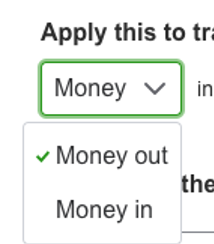
C. Set the “Apply this to transactions that are” criteria for which the rule will be applied to. QBO will generally set this correctly if you are creating the rule directly from a transaction. If it’s an expense, double-check to be sure that “money out” is selected (pictured below). If it will only come out of one account, for example your credit card, be sure to select that option as well. If the expense could come out of any one of your however many accounts , click the box for “All Bank Accounts.”
D. Set the criteria that QBO will use in its “search” for applying rules—this is the most important part. You have three options:
- Description. This option is the most straightforward. The description comes from embedded data in the transactions that QBO pulls from your bank. As a rule of thumb, the description shouldn’t be too long. Brevity and precision are key here. You can decide if the description contains, doesn’t contain, or exactly matches the text you type into the box. If creating a rule for XYPN, for example, I would use “description contains XY Planning.”
- Bank Text. This is yet again more data that is embedded in your bank transactions. It is, however, slightly different from the description data mentioned above. Bank text data is on each transaction in the banking feed as seen here:

- Amount. If the criteria you want QBO to search for is a specific amount, select “amount” and enter that number in the text box. You can choose if you want the rule to apply to an exact amount, an amount greater or less than X, or an amount that doesn’t equal X. Typically, the “amount” criteria is used in conjunction with a “description” or “bank text” criteria.
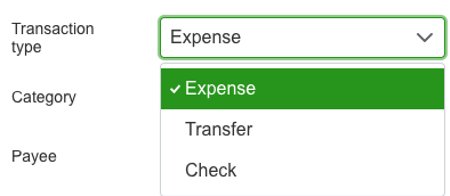
F. Choose the category. This step is also very important as it will decide which account on your books the transaction will go to. If you are unsure of which account to use, search for the vendor name and find how the transaction was previously categorized.
Bonus: You can split a transaction into multiple categories. For example, if your mid-month XYPN dues contain E&O insurance and software and technology add-on items, you can split those out by amount by using the “Split by” function. If you have a shared bill (perhaps your family plan cell phone bill?), you can split the transaction based on business versus personal use percentages.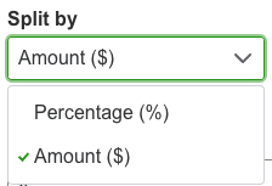
G. Add a vendor/payee. We’ve said this in previous blog posts, training services, webinars, office hours, basically to anyone who will listen… add a vendor or payee to every transaction. Every. Single. One. Yes, we are a broken record.
H. Select whether or not you want QBO to auto-add this transaction. (See my #1 tip below to learn why this matters.)
I. Finally, you can review, save the rule, and watch the little green “Rule” icons pop up on your bank feed (it’s oh so satisfying).
You now know how to access and create rules, but we’re sorry to say the struggle isn’t over. Lucky for you, I have some tricks up my sleeve. Read on for my 10 tips on best practices and how to tackle issues that might arise:
- Unless you are 100% confident in your rule-making ability, I recommend you toggle the “auto-add” feature off. If you have this feature on and QBO applies the rule to a transaction, you won’t be able to review it in the banking feed. This is an advanced feature that can save you a lot of time, but may also lead to mis-categorized transactions (which will most definitely not save you any time). By not auto-adding the transaction, you can still quickly review the transaction and add it as you would otherwise. This will ensure your rule is being applied correctly. If you’re a QBO rule-making master and/or feel confident in your rule, then flip that ‘auto-add” toggle to the other side with confidence and reap the benefits of never seeing the transaction in your bank feed! (QBO defaults to auto-add rules—you’ve been warned.)

- If you have transactions for the same amount and vendor, and that recur each month, you should apply rules to them. If you have transactions you can never remember how to correctly categorize, you should apply rules to those too so you can save yourself the time of looking back at historical transactions to jog your memory.
- Use multiple criteria, if possible. If you know you are going to have an expense for $89 to FA Bean Counters every month, use both of those criteria when creating the rule.
- Less is more. Instead of using “XY PLANNING NETWORK ACH LLC INC XYZABC” as the description for a rule, try using just “XY Planning.” It will work better and be more applicable.
- Specify an account. When a recurring expense will only be paid on your credit card or checking account, specify that account when creating the rule. That way it won’t accidentally be applied to a similar transaction on an account you aren’t intending to categorize by that rule.
- Always add a vendor/payee when creating a rule. The only way to know how much you paid a vendor through the year is by ensuring they are tied to a transaction. Rules allow you to add a vendor.
- Rename the rule something generic but applicable. You want to be able to easily search for and find the rule if needed. I almost always name my rules using the same text I used for the “Description” criteria.
- If you create a rule and can’t get it to apply to a transaction based on the description, try using the “Bank text” contains function. Copy a few key words from the bank detail in the banking feed and paste that into the text field—this works 99% of the time.
- A transaction that has already been reviewed through the banking feed can’t have a rule applied to it by the first “Create a Rule” option mentioned way back at the beginning of this post. You’ll have to use one of the other three options mentioned.
- If you created a rule and it worked well in the past but it isn’t applying to a transaction, there is a chance that the criteria you made no longer applies. Be sure to go back and edit the criteria to apply to the revised banking details. Let’s look at a rule for XYPN dues as an example. When the rule was created, XYPN dues were $421/month, and the rule had two criteria: “Bank text contains: XY Planning” and “Amount = $421”. XYPN dues then increased to $434/month; as a result, the rule was no longer applied because the “amount” criterion was no longer accurate. Once the criterion is updated to reflect the new monthly dues (“Amount = $434”), the rule will work again.
At the start of this post, I mentioned that creating rules will save you time. And it will. But the process of creating rules will take you time first. Once the rule is created, however, it’s smooth sailing because you don’t have to think about it. Simply select all of the transactions that have rules applied, quickly review, and accept them all at once.
If this is still over your head, reach out! We’d be happy to help you get your beans in a row.
 About the Author
As Manager of XYPN Books, Dan Keslin ensures that his team consistently delivers quality, accurate, and reliable results. After graduating from Montana State University, he cut his teeth preparing taxes at a local CPA firm while also starting a landscape and lawn care business, which he grew and ultimately sold. A series of events eventually brought him to FABC, where he manages a high-performing team of bookkeeping and accounting specialists. Outside of work, Dan dabbles in real estate investment, mountain biking, skiing, hunting, and just about everything Montana has to offer with his partner, Jennie Lynn, and black lab, Winni.