


.png?width=600&height=400&name=Solutions%20Spotlight%20Social%20Feature%20Image%201280x720%20(1).png)
Share this
by Patty Carr on November 10, 2020

3 MIN READ
We field a lot of questions from advisors about how to handle vendors in QuickBooks. We get it. There’s a lot to keep track of and you signed up to be a financial advisor, not a bookkeeper. Well, that’s partly true. As an independent financial advisor, bookkeeping comes with the territory (along with marketing, compliance, sales, and everything in between). Lucky for you, we know a thing or two about QuickBooks here at FABC, where bookkeeping is our bailiwick.
Below, we offer answers to the five most common questions we get about vendors.
1. Do I need to enter vendor names?Yes, we highly recommend you enter a vendor name for every transaction. When you do this, you can easily track all expenses paid to that vendor.

Plus, QBO will pick up the vendor name in the review section of the bank feed and apply the same categorization to that expense. It’s a huge timesaver.
2. How do I see which transactions don’t have vendors?These transactions will show up as “Not Specified” on the Expenses by Vendor Summary Report.
- Go to Reports
- Enter Expenses by Vendor Summary in the search field
- Set the date and click Run Report
- At the bottom of the list you will see “Not Specified” if you do have transactions not connected with a vendor
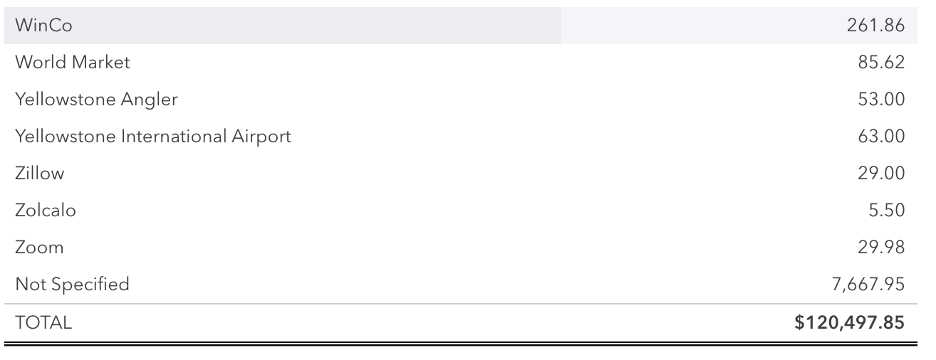
If you want to add a vendor to those transactions, click on the dollar amount in the Not Specified section. Then, open each transaction and enter a payee. Click on Save and Close.
3. How do I add a vendor name?There are a few ways to add a vendor. The easiest way is to add it while you’re reviewing the transactions from your bank feed. If there is an expense from a new vendor, it will look something like this in QBO:

Click on that expense to open it. You will see this:
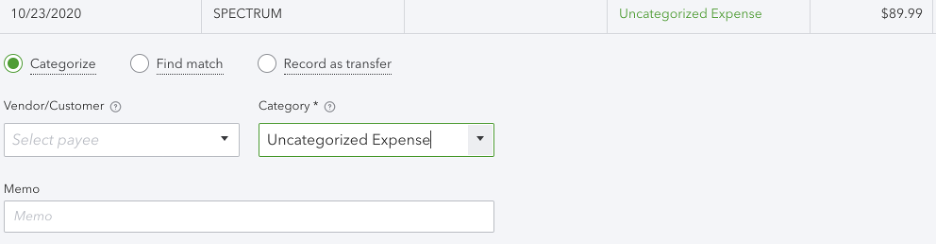
Type in "Spectrum". A new screen will appear.

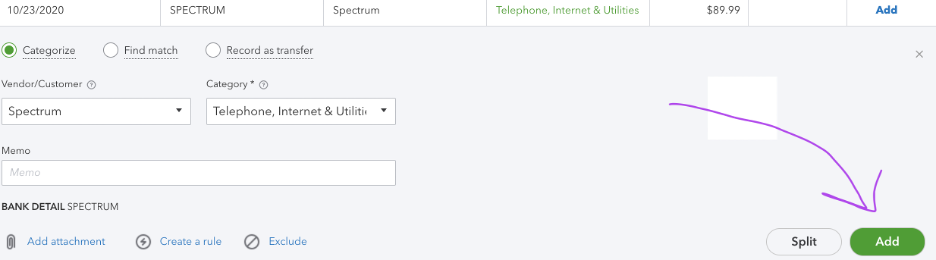
Hit Save and Spectrum is now a Vendor. When you hit Save, it will take you back to the bank feed. From there, you simply add the expense to the register.
A second way to add a Vendor is to:
- Select Expenses in the left menu and go to the Vendors tab
- Click the New Vendor button on the top right
- Enter Vendor name and Save.
4. What else do I need to know about vendors?
You can edit a Vendor by selecting Expenses, then Vendors, select the Vendor you need to Edit, select Edit, make the necessary changes, then hit Save
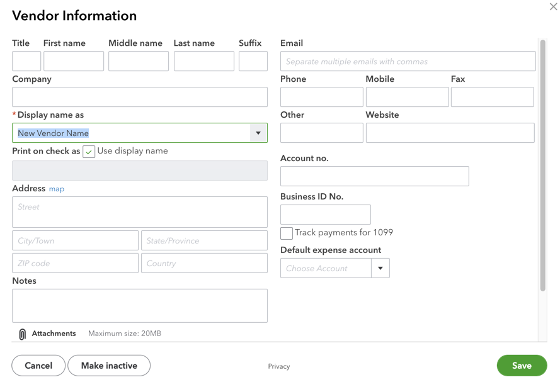
If you realize that you have one vendor with two entries in QBO (ie. "RIGHTCAPITAL" and "Right Capital", you can Merge those Vendors. Select Expenses and then Vendors, Click on the vendor that you want to change (let’s say ‘Right Capital’), then select Edit. Change the title from "Right Capital" to "RIGHTCAPITAL". You will see this screen:
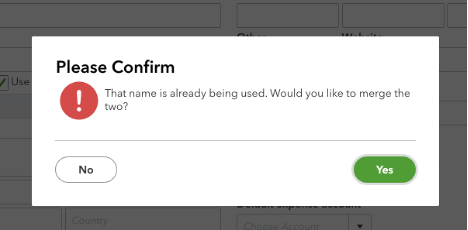
Hit Yes to confirm.
If you are no longer using a Vendor, you can make that Vendor inactive by selecting Expenses, then Vendors, and then selecting Make Inactive in the drop-down menu beside the Vendor that you want to make inactive
5. How do I set up vendors for 1099 tracking?**THIS IS IMPORTANT**
QBO will track your expenses to Independent Contractors, but that contractor/vendor must be set up correctly. This is how you do it:
- First, you will need to request a W-9 from that contractor
- In QBO, go to Expenses and then Vendors
- Using the information from the W-9, fill in the Vendor Information
- Check the box that says ‘Track payments for 1099’
- Fill in the Contractor's EIN or Social Security #
- Attach the W-9
- Hit Save
![]()
That’s it for today. Still feeling like you're in over your head with bookkeeping? Get in touch and we'll gladly throw you a life preserver.
 About the Author
Patty Carr is an account specialist (aka Bean Counter) with FABC. She owned and operated a successful restaurant in Bozeman, Montana, selling it after 20 years of business. Patty's goal—in addition to keeping excellent books, of course—is to make a personal connection with her clients, and ultimately to make bookkeeping "cool."