


.png?width=600&height=400&name=Solutions%20Spotlight%20Social%20Feature%20Image%201280x720%20(1).png)
Share this
by Danielle Simard on June 28, 2022
.png?width=720&name=BLOG%20IMAGES%20TEMPLATE%20(59).png)
4 MIN READ
So you’ve got your books set up, perhaps in one of our Set-up & Training Workshops, now what? Keeping your books clean and up to date is important, especially in the highly regulated financial services industry. It can feel overwhelming when you first begin–I am here to give you some key tips and tricks to properly maintain your books.
Step 1: Categorize Transactions
From the banking tab on the left menu bar, you can categorize transactions to the appropriate account from your Chart of Accounts. See an example COA here. If you haven’t linked your bank accounts yet, you can do so by clicking “link account” on the banking screen.
To categorize your transactions, start by clicking on the item you wish to work on. There will be an option at the top to choose “Categorize” for expenses & deposits, “Transfer,” or “Record as credit card payment.” Select the appropriate box. Include the vendor/customer and account category.
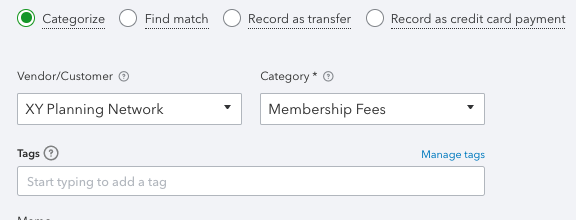
Some key things to look out for:
- Be sure to include vendor names when categorizing. This is important when you file 1099’s for tax season. It saves you the hassle of having to go back and fix them later! Want to know more about 1099’s? See our 1099 FAQs blog post.
- You can get specific, but not too specific. For example, you may like to create sub-accounts for your Legal & Professional accounts, say Compliance, Accounting, and Bookkeeping. This will help you keep those important categories organized. However, some accounts are better left broader. For example, Software and Technology can often have so many types of vendors that it is cleaner to group all software to one overarching account.
- Beware of putting everything to Office Expenses. While many expenses can fall under this category, it is important to know what types of things should be recorded elsewhere. For example, any purchases for assets that cost more than $2,500, such as furniture, should go to your Fixed Assets account and be depreciated. Office meals should go to your Meals account. Office software should go to Software and Technology. Essentially, if there’s an account that allows you to get a bit more specific, use it!
- Do you have some personal expenses paid from your business account? Don’t panic! Simply categorize those expenses to your “member distributions” account, with the vendor's name as the payee.
- Use Rules to help you categorize. If you have vendors that will always go to a certain account, create a rule to save you the hassle. See our blog post, How to Create Bank Rules, for more details.
Step 2: Accrual Entries for Advanced Income
(On cash basis or bill in arrears? Skip to step 3!)
As a financial planner, you may notice your state regulations require GAAP for your financial documents, meaning you must use accrual-basis accounting. If this applies to you, you’ll need to break out your income over the following three months of the quarter. Let’s use an example to explain:
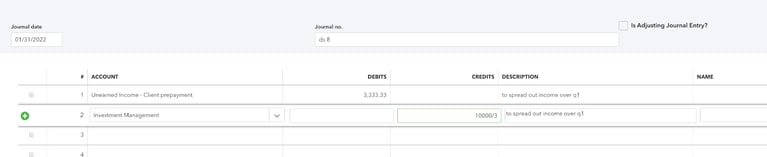
Example: You receive $10,000 in AUM fees in January for the first quarter:
- Instead of booking it to your AUM fees income account, book it to your Unearned Income account. If you haven’t yet, make sure to set it up as “Other Current Liability” for the account type.
- Now, you need to recognize this income over January, February, and March via three journal entries with end dates 01/31, 02/28, & 03/31. The amount will be $10,000/3, debiting Unearned Income and crediting your AUM income account. All three entries will be identical aside from the dates. Sometimes, you may need to adjust one entry’s amount by a cent or two to account for rounding. The final Unearned Income account balance should be zero.
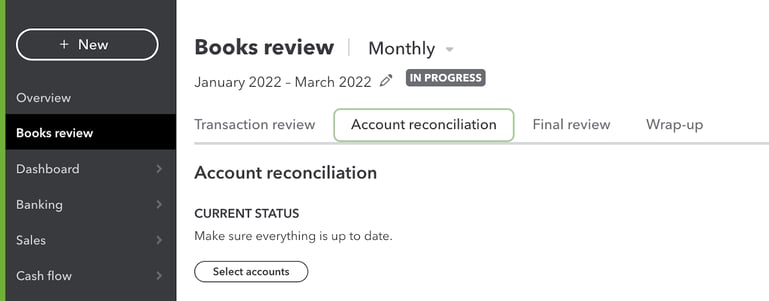
Step 3: Books Review Tab
I always check my “Books review” tab on the left menu bar before reconciling. This super useful page highlights any transactions that are missing payees or were marked as uncategorized. These are important items to clean up on a monthly basis. You can also view the accounts that are regularly reconciled and when they were last reconciled.
Note: Some versions of QuickBooks do not have the “Books Review” tab. In this case, go to accountant tools at the top and select report options to view your reconciliation status. To view uncategorized expenses & income, navigate to the left toolbar, hover over accounting, and choose “Chart of Accounts.” Search uncategorized expense/income and select your desired date range.
Step 4: Reconcile!
Reconciling your books monthly is one of the most important steps to ensuring your books are accurate and up to date. Reconciliation involves comparing transactions in QuickBooks to transactions on bank statements to resolve any discrepancies. Check out QuickBooks’ How to Reconcile video for more detail. The goal is to have no differences between your statement and what you have on your books at the end of each month. However, we all know things don’t always work out so nicely! Below are some tips for resolving issues on the reconciliation page.
- Is your reconciliation not giving you the pretty green $0.00 check mark? Personally, the last thing I want to do is leaf through each transaction. First, I check my reconciliation information. Did I get the correct end date and amount?
- Next, I will uncheck any transactions that are on or close to the end date and see if that fixes the issue. Sometimes transactions on the cusp will not post until the following statement.
- Next, I go to my banking screen and make sure there are no transactions sitting in the bank feed within the date range I need.
- I may search for the amount that the reconciliation page is off by. Perhaps I booked, say, a Credit Card payment to the incorrect account.
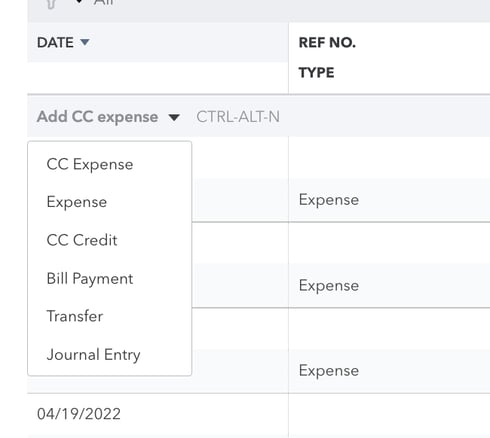
- If none of these steps are working, the next step is to go through each transaction on the statement and check the corresponding transaction on the reconciliation page. Through this process, you will find transactions that are missing from QuickBooks or transactions that were inappropriately booked to the account you are reconciling. Sometimes, you may need to manually enter expenses, payments, or cash back rewards to the account. You can do this by clicking “Bank register” from the reconciliation page, then selecting the drop-down arrow and choosing the appropriate action:
- Although it may be tempting, do not exclude transactions from the reconciliation page unless it makes sense. Sometimes, QuickBooks will duplicate transactions. This is one example of when it is okay; however, most times you can resolve differences with the methods listed above.
Step 5: Review Your Monthly Reports
It is always a good idea to review your Profit & Loss and Balance Sheet on a regular basis. This allows you to look over your income, expenses, and liabilities to ensure there are no mistakes. Check out our blog post How to Review your Books for more details!
Hopefully, this step-by-step guide was helpful in getting you on your feet with properly maintaining your books. However, if you are feeling like throwing in the towel so you can focus on what you love, Connect with the Bean Team. After all, bookkeeping is what we love!

About the Author
As a Bookkeeping Specialist on team XY Bean Counters, Dani Simard looks forward to providing XYBC clients an exceptional client experience (and exceptionally accurate books). Dani loves hiking and plays the clarinet in her free time.