


Share this
by Katie Ament on April 19, 2022
.png?width=720&name=BLOG%20IMAGES%20TEMPLATE%20(46).png)
4 MIN READ
If you’ve ever logged in to QuickBooks Online (QBO), you’ve likely seen the time-saving feature that is the banking feed. By establishing a connection to your bank accounts, your transactions can flow directly into QuickBooks for review, avoiding the need for manual entry.
While this feature is convenient and functional most of the time, like all technology, there may be situations in which the QBO connection to your bank is down. For example, a change in your online banking password or an update to your bank’s privacy agreement are a couple of scenarios that may require a banking feed reset in QBO. If attempts to reset the connection are not immediately successful, but there are transactions that need to be entered, don’t worry about spending your day manually entering them all just yet—there’s a much better option! Banking transactions can also be directly uploaded to QBO from a CSV file, and this post outlines the step-by-step process to do so.
Download a CSV File of Your Transactions
A CSV file is an alternative way to view your bank statements in excel format that most banks offer within their online banking platforms. Each bank will require slightly different steps to obtain the file, but it typically entails selecting the statement or date range you’d like to download and then choosing to download the CSV file rather than the typical PDF format. If you are unsure about how to locate this option within your bank’s online platform, please contact your bank customer service representative for guidance or use the online help function.
(A note on exporting credit card transactions: before saving your credit card CSV file, double-check the transaction amounts prior to uploading to QBO to avoid ending up with credit transactions rather than expenses. Review your CSV file to ensure any expenses show as negative numbers. If they are positive numbers, first click on any empty cell within the file and type “-1”. Then, select all of the transactions within the transaction column. Next, click “Paste” at the top of the document and select “Paste Special”. Then mark “Multiply”, and “OK” to change the expenses to negative amounts. Review to ensure any payments or credits are flipped back to positive numbers, and then save your file and proceed.)
Upload Your CSV File
Once you’ve saved the CSV file accordingly for the transactions you need to enter, navigate to the “Banking” section of your QBO login. Then, click “Link Account” on the top right-hand side of the screen, followed by “Upload from File.”
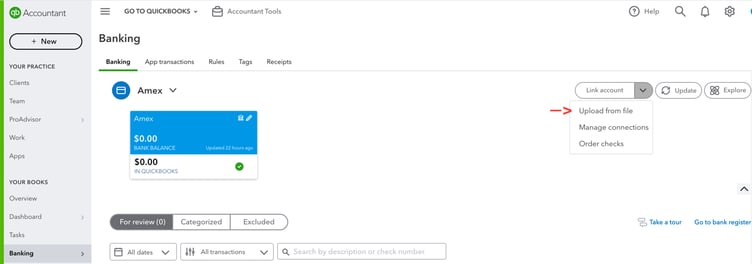
Click “Link Account” on the top right-hand side of the screen, followed by “Upload from File.”
You’ll then be presented with two options, connecting to your bank on the right or uploading the CSV statement on the left. Since we’ve already established that your bank’s connection is not working at the moment, you’ll upload your CSV file at the option on the left and click “Continue.”
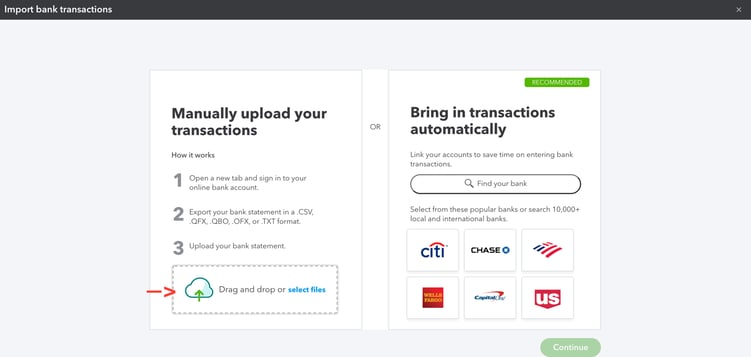
Select to manually upload your transactions.
Next, select the account you’d like to upload the transactions to within the dropdown and select "Continue."
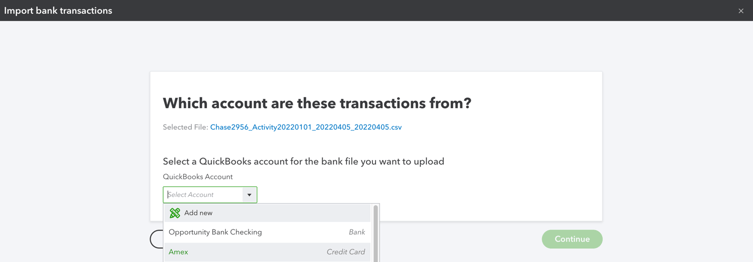
Select the account you’d like to upload the transactions to.
Now you’ll arrive at the mapping page, which is arguably the most important part. Here you’ll want to make sure that QuickBooks has a full understanding of the data you’re uploading by answering the questions based on what is in your CSV file. In Step One you’ll have three formatting questions, and in Step Two you’ll have three data field questions. Once your responses align with the information on your CSV file, click Continue. Take a look at the following corresponding QBO and CSV files for an example of how the responses line up:
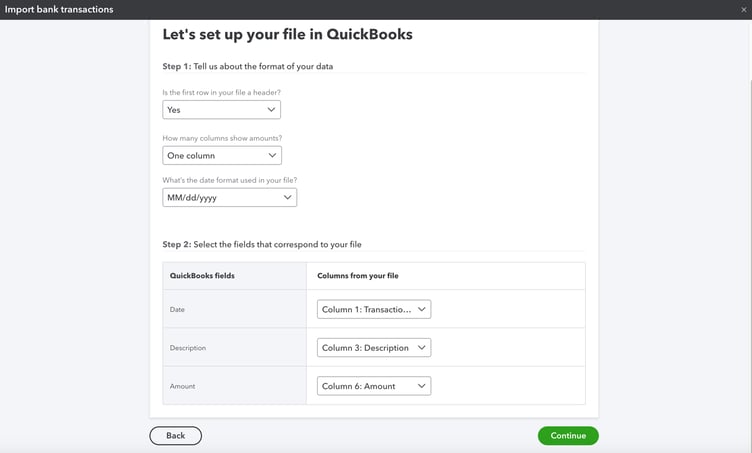
Enter the appropriate information in Step 1 and Step 2 pictured above. The answers above correlate to the transaction export shown in Figure 1 below. 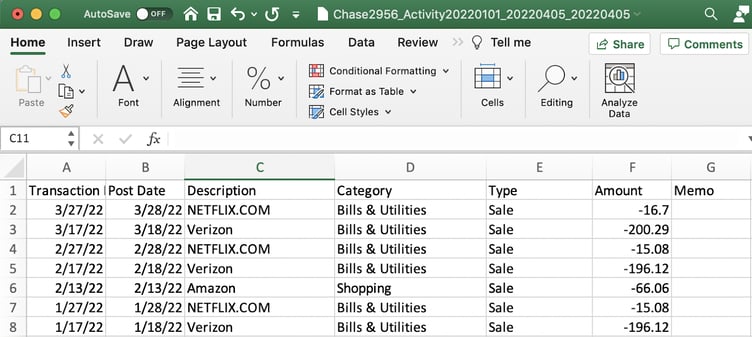
Figure 1
Once you’ve uploaded the CSV data, QBO will provide you with a list of pulled transactions to review and select for final import. This is a great place to check for accuracy, including whether or not expenses are negative and credits are positive. If everything appears correct, select the needed transactions and hit “Continue.”
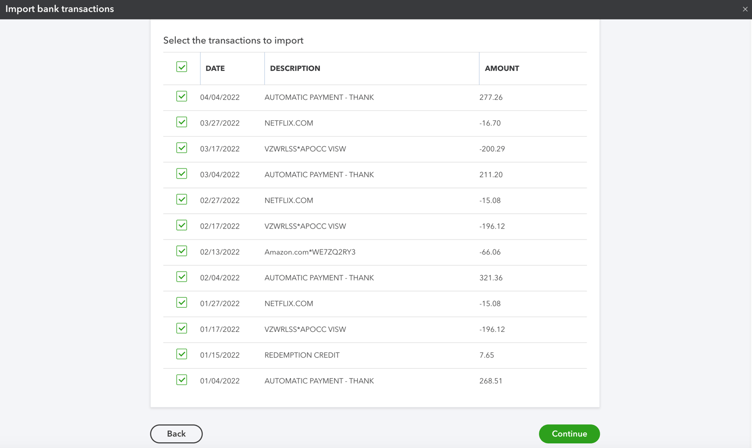
If everything is accurate on this screen, hit "Continue" to finish your upload.
Congratulations, you did it! You should now be able to view your imported transactions from the Banking feed as if they fed right in from the bank itself. Categorize and add each transaction accordingly, and leave the tedious work of manually entering transactions in the past.
Want to wash your hands of bookkeeping altogether so you can focus on what you love? Connect with the Bean Team—bookkeeping is what we love most (and we're pretty darn good at it too).
 About the Author
As Lead Account Specialist for XY Bean Counters, Katie Ament prides herself on providing an exceptional client experience, and exceptionally accurate books. She views each set of books as a puzzle to be solved and enjoys putting all of the pieces together. Katie loves that being on the Bean Team allows her to work with both numbers and people on a daily basis. In her free time, she stays busy chasing her four-year-old twins with her husband Mike and two Belgian shepherds.